Get $20 off any order with code: CRYPTO2025.

Check Out the Most Profitable: “Kasper Miners“& “Alephium Miners”       “Doge Miner“&”ALEO Miner

cart 1

Your Cart

04/29/2025 1 Comment

Introduction: The Definitive Aleo Mining Guide for Beginners and Experts

The IceRiver AE0 and AE1 Lite represent the cutting edge of ASIC mining technology specifically engineered for Aleo cryptocurrency mining. These specialized devices have revolutionized the accessibility of Aleo mining, offering an efficient pathway to participate in this privacy-focused blockchain network using the innovative AleoBFT algorithm. This comprehensive guide provides exhaustive instructions for every stage of the mining process—from initial unboxing to advanced optimization techniques—ensuring both newcomers and experienced miners can maximize their mining potential.

What Are IceRiver AE0 and AE1 Lite? Understanding These Revolutionary ASIC Miners

Comparison with Other Mining Solutions

Unlike general-purpose GPU mining, these ASIC miners offer several distinct advantages for Aleo mining:

FeatureIceRiver AE0IceRiver AE1 LiteTypical GPU Mining Rig (6 GPUs)
Hashrate60 MH/s300 MH/s30-60 MH/s
Power Consumption100W500W900-1200W
Efficiency1.67 J/MH1.67 J/MH15-30 J/MH
Setup ComplexityMinimalMinimalHigh
Space RequiredVery SmallSmallLarge
Noise Level45dB50dB65-75dB
Initial Investment$799$2799Higher

According to a study by the Cambridge Centre for Alternative Finance, specialized ASIC miners like the IceRiver series typically offer 10-100x better energy efficiency than general-purpose computing hardware for cryptocurrency mining. This translates directly to lower operational costs and higher profitability.

Unboxing and Hardware Requirements: Setting the Foundation for Mining Success

When receiving your IceRiver AE0 or AE1 Lite, it’s important to follow proper unboxing procedures to ensure all components are accounted for and undamaged. The packaging is designed to protect the sensitive electronic components during shipping.

What’s in the Box

Upon carefully opening your IceRiver Miner package, you should find:

  • The main miner unit with power supply unit (AE1 Lite is PSU intergrated)
  • AC power cord appropriate for your region
  • Quick start guide with basic setup instructions
  • Warranty card and quality control certification
  • QR code linking to comprehensive online documentation

Additional Equipment You’ll Need

For optimal operation, you’ll need to supply several additional components:

  • Networking equipment: A Cat5e or Cat6 Ethernet cable (minimum 3 feet/1 meter) to connect the miner to your network router or switch. While the miners don’t require particularly high bandwidth (typically using less than 10MB per hour), a stable internet connection with 99.5%+ uptime is essential for consistent mining operations.
  • Wifi Antenna: If you want to connect AE0 or AE1 lite with Wifi, you will need to prepare a wifi antena.

Power and Environmental Requirements

The miners operate on standard household power (100-240V), so no special electrical installations are required. However, calculating your power consumption is important for profitability considerations:

  • AE0: 100W × 24 hours = 2.4 kWh per day
  • AE1 Lite: 500W × 24 hours = 12 kWh per day

For optimal performance, maintain an ambient temperature between 15-30°C (59-86°F) with relative humidity below 65%. While the miners can operate in temperatures up to 40°C (104°F), efficiency decreases and component lifespan may be reduced at higher temperatures.

According to the U.S. Department of Energy, electronic devices operating in environments 20°C above their optimal range can experience up to 40% reduction in lifespan. Investing in proper cooling and ventilation can significantly extend your mining hardware’s operational life.

Powering On Your Miner: First Steps to Mining Success

Setting up your IceRiver miner requires careful attention to proper placement and connection procedures to ensure optimal performance and longevity of your investment.

Optimal Placement Considerations

Begin by selecting a location with the following characteristics:

  • Good ventilation: Natural airflow or mechanical ventilation helps dissipate heat
  • Minimal dust: Dust accumulation can impede cooling and increase internal temperatures
  • Stable surface: The miner should be placed on a flat, stable surface that won’t vibrate
  • Clearance: Maintain at least 6 inches (15cm) of clearance on all sides
  • Away from water sources: Avoid areas with high humidity or risk of water exposure
  • Limited noise sensitivity: While quieter than many miners, consider the operational sound
  • Access to power and network: Positioned within easy reach of electrical outlets and network connection

Research by the American Society of Heating, Refrigerating and Air-Conditioning Engineers indicates that electronic equipment in well-ventilated environments with consistent temperatures can experience up to 30% longer operational lifespans compared to poorly ventilated locations with temperature fluctuations.

Connection Procedure

Follow these steps to properly connect your miner:

  1. Power connection: Connect the included power cord to the miner’s power input socket, ensuring it’s fully seated. Then connect the other end to a grounded electrical outlet. If possible, use a surge protector or uninterruptible power supply (UPS) to safeguard your investment against power fluctuations.
  2. Network connection: Connect one end of your Ethernet cable to the miner’s network port (RJ45 connector) and the other end to your router or network switch. Ensure the connectors click into place securely at both ends.
  3. Verification: Before powering on, double-check all connections and ensure adequate clearance around the unit.

Power-On Sequence and Indicator Light

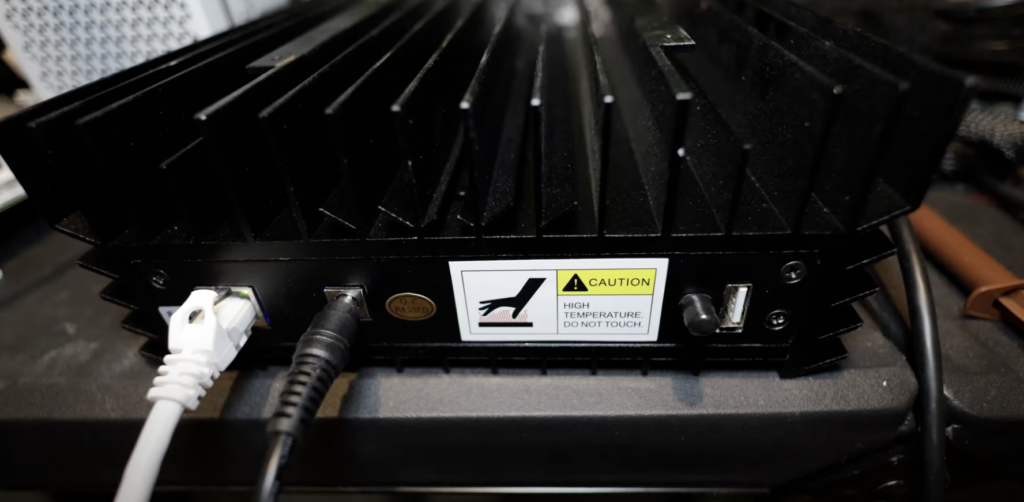
When you power on the miner by pressing the power button (located on the front panel for the AE0 and on the side for the AE1 Lite), observe the LED indicators:

  1. Power LED (typically green): Should illuminate immediately, indicating the power supply is functioning correctly.
  2. Status LED (typically blue): Will begin blinking as the system boots up. This process takes approximately 30-60 seconds, after which the status LED should remain solid, indicating the system is fully operational.
  3. Hash rate indicator LEDs (typically yellow): These will begin to light up sequentially as the miner starts processing. On the AE0, you’ll see 5 LEDs representing 20% increments of maximum hashrate. The AE1 Lite features 10 LEDs representing 10% increments.
  4. Network LED (typically green/amber): Located on the Ethernet port itself, this should show solid or blinking lights indicating network connectivity.

This visual feedback helps confirm your miner is functioning correctly. If you don’t see these expected LED behaviors, check all connections and ensure power is being supplied properly.

Finding Your Miner’s IP Address: Essential Network Discovery Techniques

Before you can configure your miner, you need to locate its IP address on your network. This step is crucial as it allows you to access the web-based management interface. There are several methods to accomplish this, ranging from beginner-friendly to more technically advanced approaches.

The most straightforward approach is using the official IceRiver Miner IP Reporter Tool, which is specifically designed to detect IceRiver miners on your network:

  1. Download the tool: Visit the official IceRiver website (iceriver.io) and download the IP Reporter Tool appropriate for your operating system (Windows, macOS, or Linux).
  2. Extract the files: After downloading, extract the compressed file to a folder on your computer. The extraction process varies by operating system:
    • Windows: Right-click the ZIP file and select “Extract All”
    • macOS: Double-click the ZIP file to extract
    • Linux: Use the command unzip filename.zip in terminal
  3. Run the application: Navigate to the extracted folder and run the application:
    • Windows: Double-click the .exe file (you may need administrator privileges)
    • macOS: Double-click the .app file
    • Linux: Make the file executable with chmod +x filename then run with ./filename
  4. Scan results: The tool will automatically scan your network and display all connected IceRiver miners with their:
    • IP address
    • MAC address
    • Model number
    • Firmware version
    • Current hashrate (if mining)
  5. Note the IP address: Record the IP address shown for your miner. This will typically be in the format 192.168.x.x or 10.0.x.x depending on your network configuration.

This tool is the most reliable method for finding your device as it uses specific protocols to identify IceRiver miners on the network.

Via Router DHCP Client List (Alternative Method)

Another approach is checking your router’s DHCP client list, which shows all devices that have been assigned IP addresses:

  1. Access router admin panel: Open a web browser and enter your router’s IP address in the address bar. Common router addresses include:
    • 192.168.0.1
    • 192.168.1.1
    • 10.0.0.1
    If unsure, check the label on your router or consult your internet service provider’s documentation.
  2. Login credentials: Enter your router’s admin username and password. If you haven’t changed these, they may be the default credentials (often printed on the router or in its manual).
  3. Navigate to connected devices: Different routers use different terminology, but look for sections labeled:
    • “Connected Devices”
    • “DHCP Client List”
    • “Attached Devices”
    • “Client List”
  4. Identify your miner: Look for a device named “IceRiver” or “IceRiver-AE0” or “IceRiver-AE1” in the list. Alternatively, check for the MAC address printed on your miner’s label (a 12-character code in format XX:XX:XX:XX:XX:XX).
  5. Note the IP address: Record the corresponding IP address shown next to your miner’s entry.

This method works well if you have access to your router’s administration interface and is particularly useful in home or small office environments.

Accessing the Web Interface: Your Control Center for Mining Operations

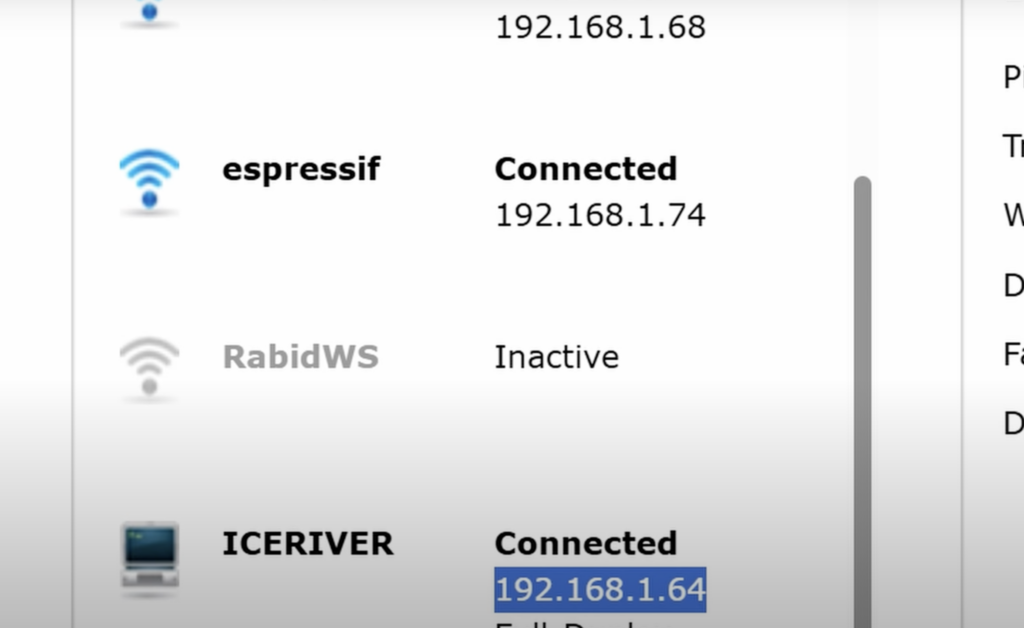
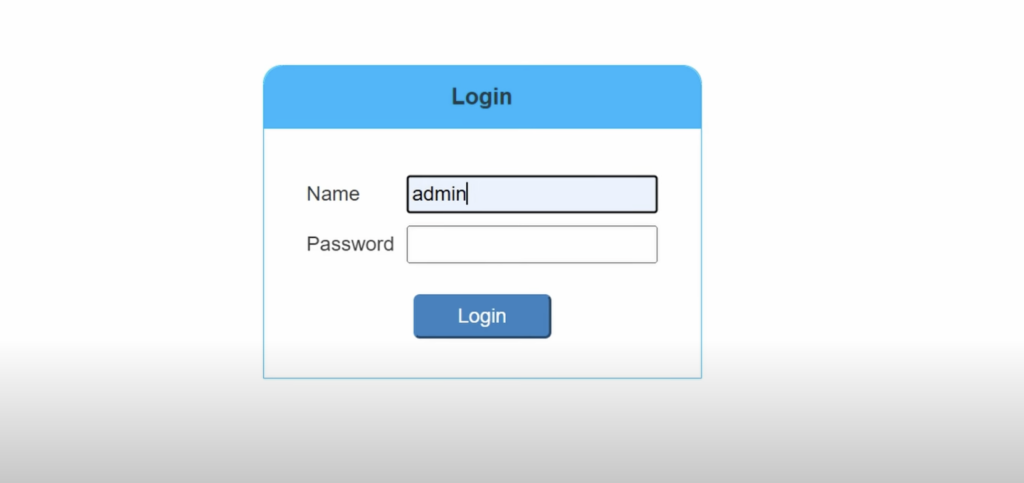
Once you have identified your miner’s IP address, you can access its web-based management interface, which provides complete control over all aspects of your mining operation. The Default login username is : Admin , Password is :12345678

Name: admin Password: 12345678

Enter Mining Pool information (Workername & Pool URL)

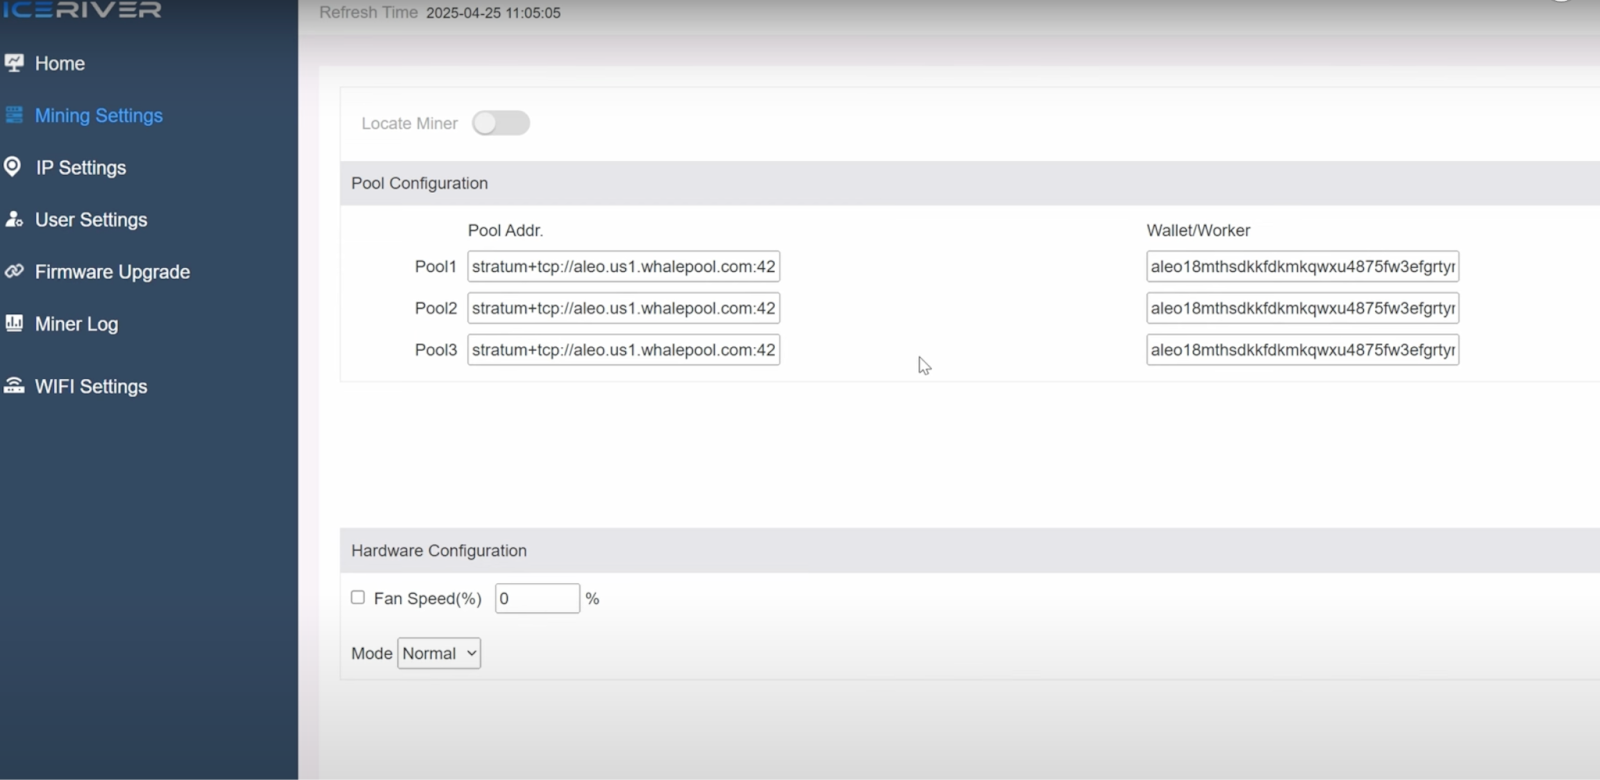
After Entering the The IceRiver web interface, go to the mining settings page and enter your pool address and workername.

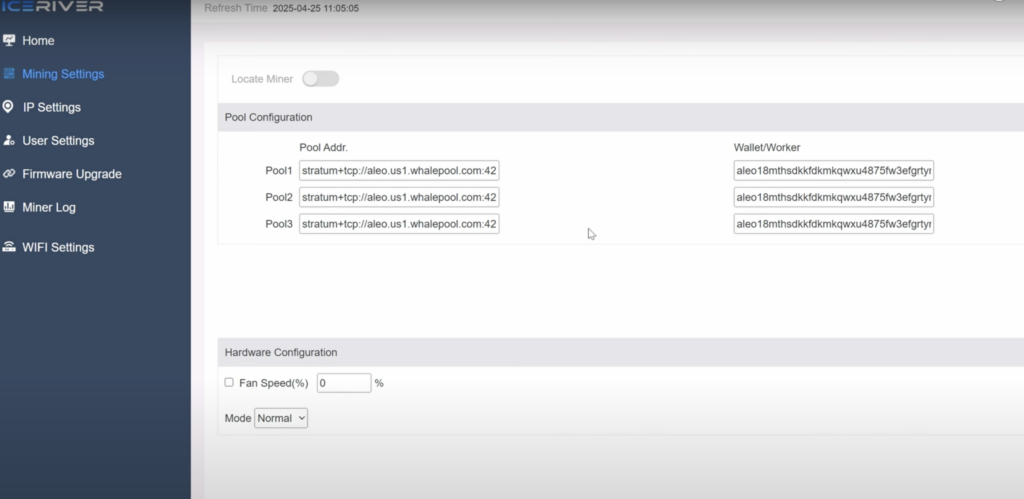
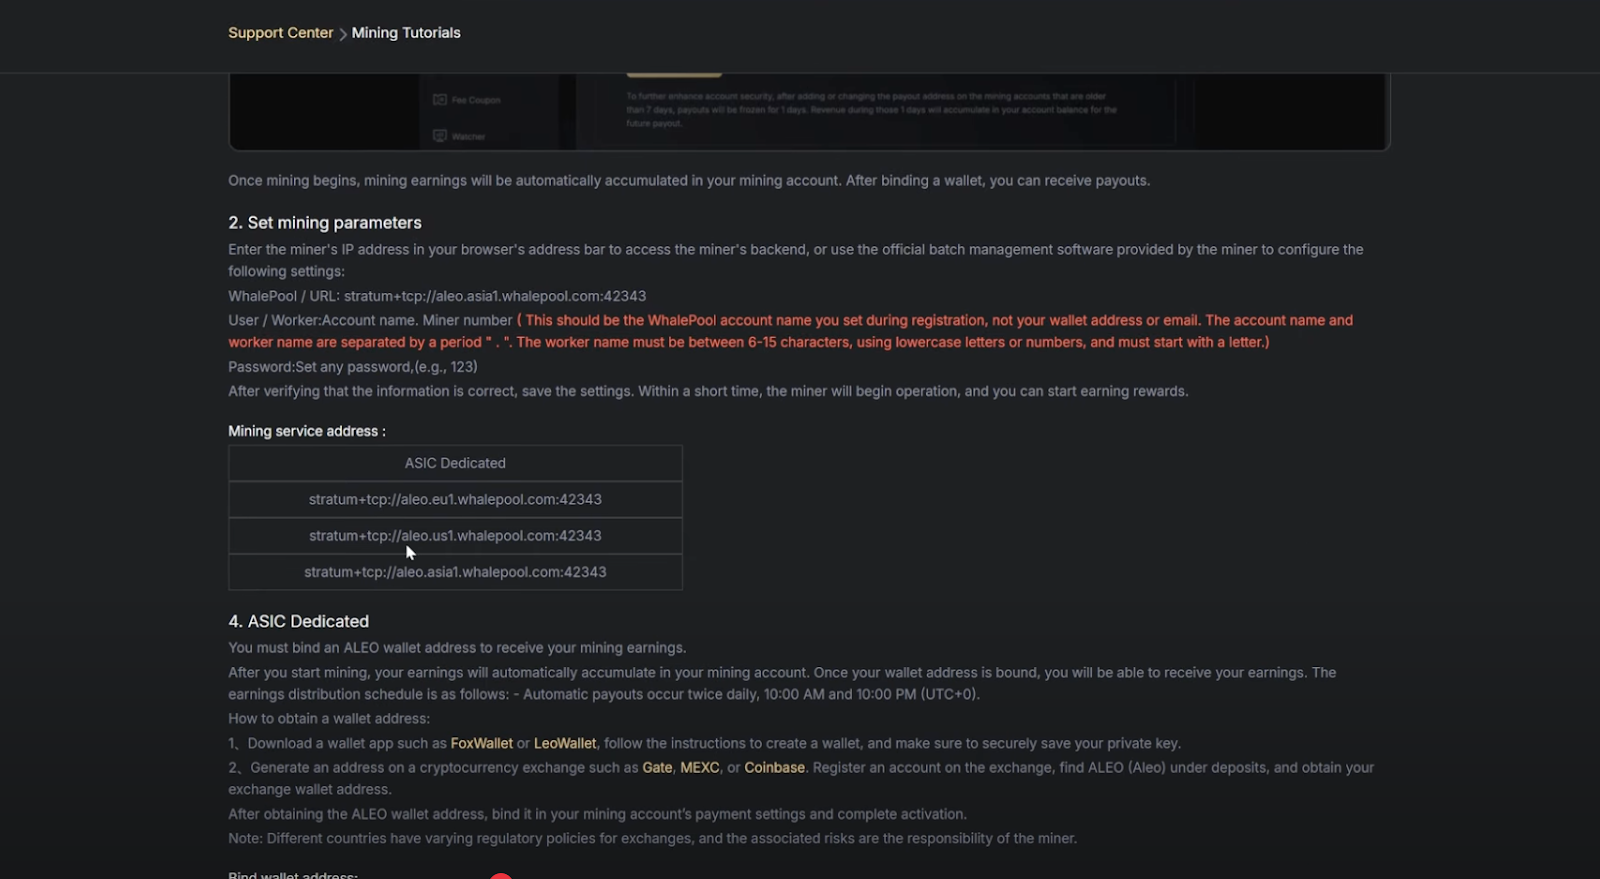
For the mining pool, we recommend few options below:

  1. Dxpool
  2. F2pool
  3. Whalepool

Check Mining Pool Stats to choose an Aleo pool.

  • Let’s take the Whalepool for illustration here. You can Register an account with Whalepool on their website and find the Aleo mining tutorial page, and there you can find the aleo mining pool url addresses.
  • If you’re in the US, you can copy that mining pool and paste it into pool address 1, and you can copy the other region addresses as backup pools on pool addresses 2 and 3.
  • Once you are done with your pool addresses and wallet name, the next is the password. It can be anything of your choice.
  • After entering all the details, hit save.

Start Mining Aleo

.You can see your Iceriver AE0 is connected to your preferred Aleo mining pool and started mining Aleo.

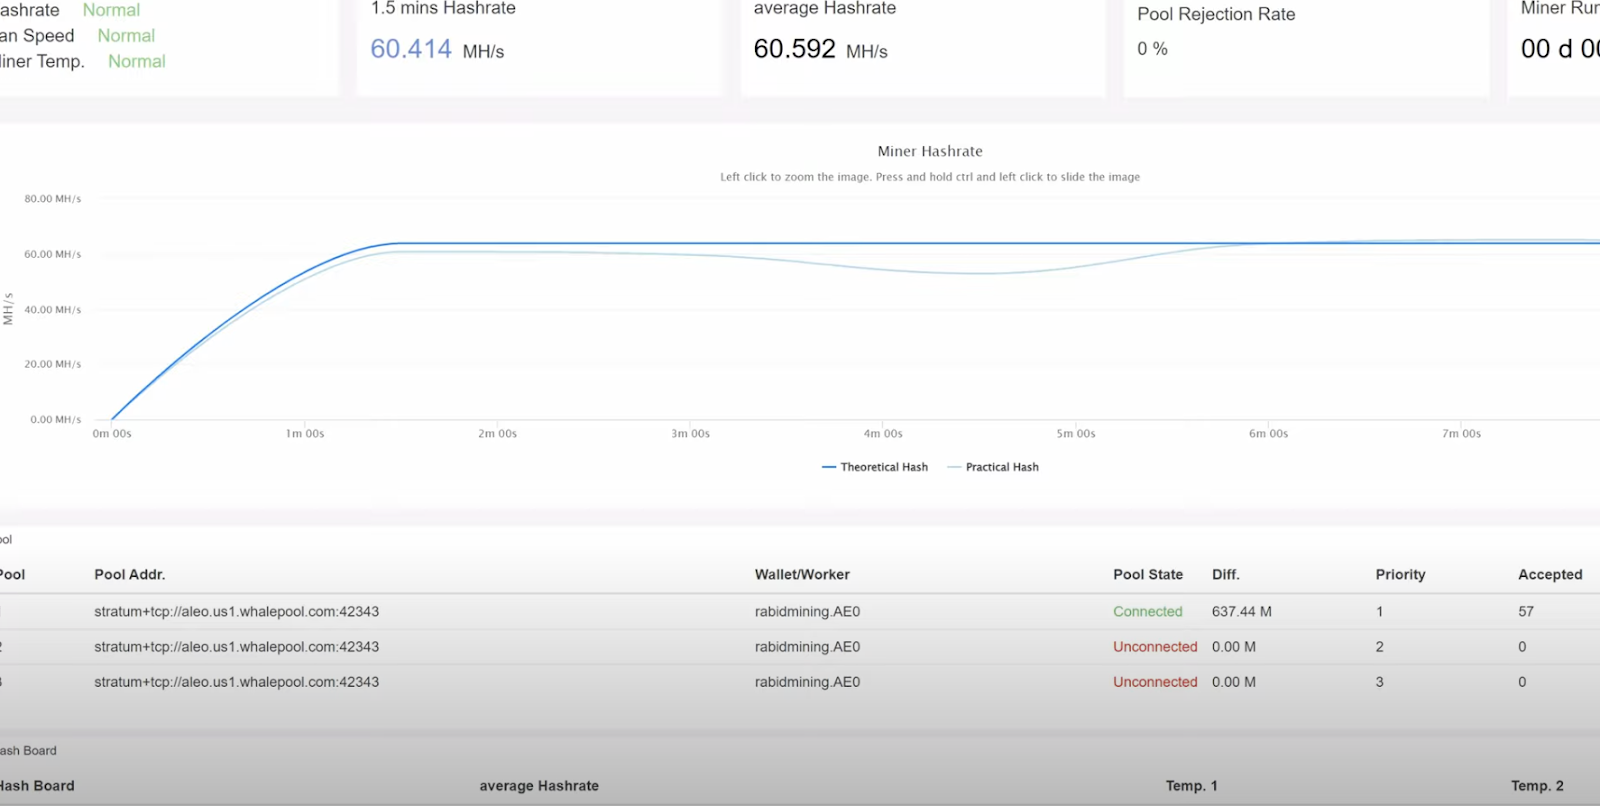
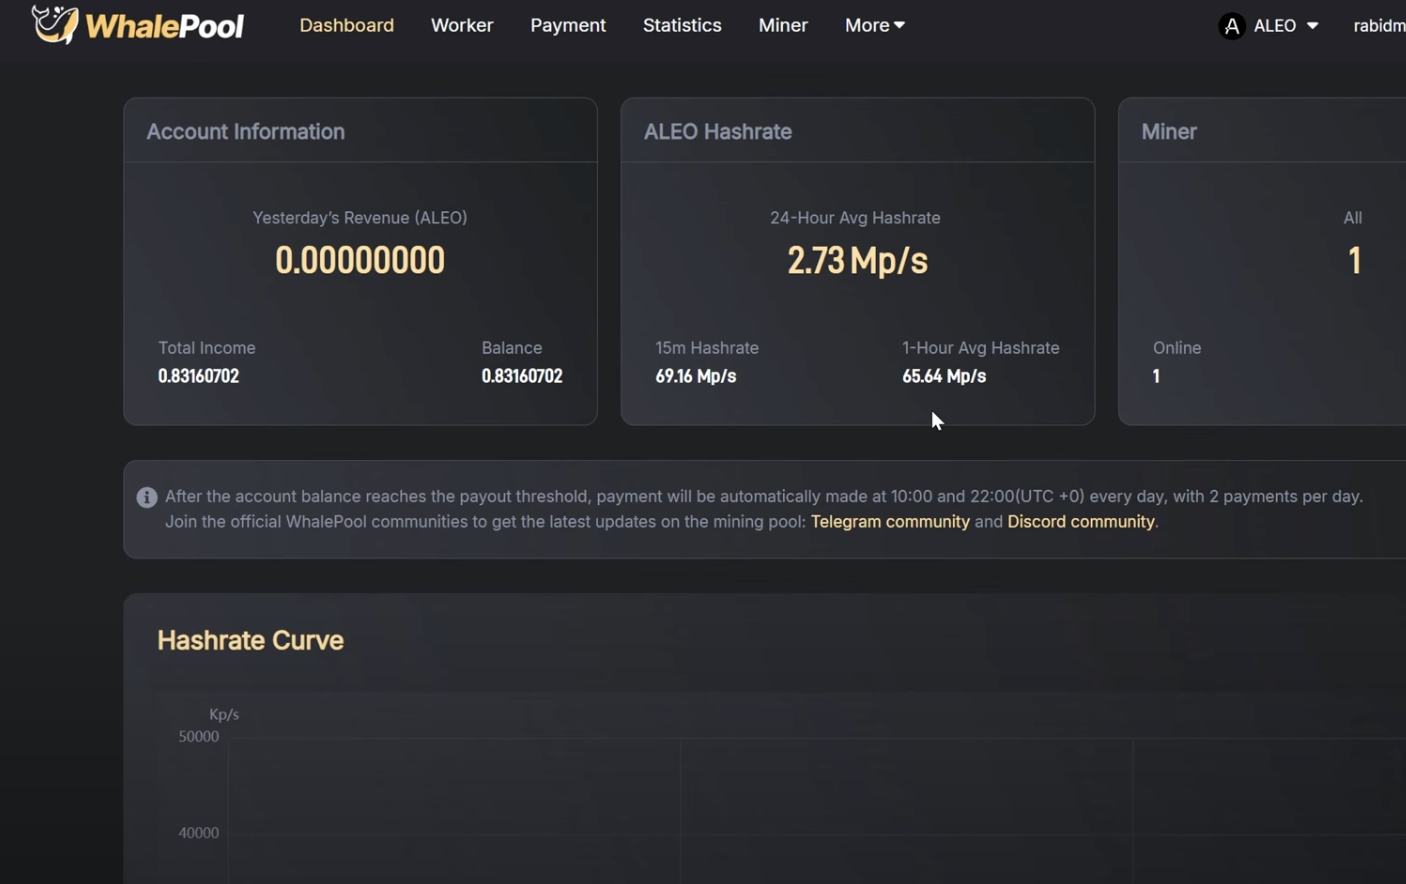
You can also check the mining status and mining rewards from your aleo mining pool dashboard in real-time

CONCLUSION

IceRiver is a well-known brand in the crypto mining industry. Its recent launch, IceRiver AE0 and IceRiver AE1 Lite, are super energy efficient options for mining Aleo. The miner comes with an excellent hash rate, energy efficiency, and low power consumption. Additionally, its compact size and reduced noise level make it ideal for home mining as well. If you’re into Aleo mining and considering an ASIC miner, you should give a try on those two miners. In case of any issue, you can always give a call to BT-Miners and setup a tech meeting. Our team can assist you to solve your problem.

1 Comment

  1. 05/14/2025
    jeremy Raymond

    Well done, wish IceRiver had a walk through for there own product. Was having trouble till I found this info. Glad to be a customer of BT-Miners

Leave a Comment

Join our Telegram Group

Scan to join our telegram group